GParted Live 0.14.1-6 ISO download

The new distribution release of GParted Live has been rolled out. Here is the new GParted Live version 0.14.1-6, a powerful Linux distribution that was designed for disk partitioning purposes. This new version of GParted is now supports Windows 8 which means we can boot this GParted on a Windows 8 computer and edit the partition inside it.

gparted-live


Install Handbrake on Ubuntu 13.04

Handbrake is a popular and powerful video transcoder for Linux. With this tool you can convert your DVD movie into other video format such as MP4 or MKV. Handbrake comes with a simple GUI front end.


install-handbrake-ubuntu


Convert FLV to MP3 on Ubuntu 12.10

Convert FLV to MP3 on Ubuntu 12.10

FLV is a common video format that usually found on online video website such as YouTube and some others. In some cases, we want to convert the FLV video and save the audio into MP3 format. In Linux, especially Ubuntu, we can easily convert FLV to MP3 using FFMpeg package. See how we do it.

A. Install FFMpeg

sudo apt-get install ffmpeg

B. Convert FLV video to MP3

To convert, use the following command

ffmpeg -i /home/video/test.flv /home/music/test.mp3


Change the /home/video/test.flv with your flv video location and change /home/music/test.mp3 as the destination.

Fatrat is my favorite download manager for my Deepin Linux 12.06

What is your favorite download manager for your Linux distribution? There are several good download manager applications available for Linux. Have you ever tried Fatrat? Fatrat is an open source download manager for Linux written in C++ and built on top of the Trolltech Qt 4 library. It is rich in features and is continuously extended.

With Fatrat, we can download torrent, ftp file and many more. We can also manage and limit the download bandwidth limit and speed. Fatrat is a free and powerful download manager that is easy to use and rich features.

fatrat

How to install Clamtk on Fedora 18

Clamtk is a powerful GUI antivirus that based on ClamAV, a powerful Linux antivirus. On this tutorial, I will show you how to install and configure ClamTk on Fedora 18. After this tutorial you will be able to install ClamTk on Fedora 18.

Steps to install Clamtk

Open Terminal and login as root and then type the following command
yum install clamtk
Once finished, you have to make sure that ClamAV virus database is up to date. Open the file /etc/freshclam.conf.
nano /etc/freshclam.conf
How to install Google Chrome on Linux Mint 14 Nadia

How to install Google Chrome on Linux Mint 14 Nadia

Google Chrome can be added to Linux Mint 14 Nadia in a simple way. See how we install Google Chrome stable on Linux Mint 14 Nadia.

Open Terminal and edit the /etc/apt/sources.list

wget -q -O - https://dl-ssl.google.com/linux/linux_signing_key.pub | sudo apt-key add - 


Add the following line to the sources.list file


sudo sh -c 'echo "deb http://dl.google.com/linux/chrome/deb/ stable main" >> /etc/apt/sources.list.d/google.list'


Update Linux Mint


sudo apt-get update

sudo apt-get install google-chrome-stable


Enjoy Google Chrome on Linux Mint 14

Install VirtualBox Extension Pack on a ClearOS 6.3

Install VirtualBox Extension Pack on a ClearOS 6.3

On my previous tutorial, I've show you how to install a headless VirtualBox on a ClearOS 6.3. Now, on this tutorial, I will show you how to install the extension pack. This extension pack is required to enable the remote administration of Virtualbox using RDP or phpvirtualbox.

Steps to install Virtualbox Extension Pack

cd /tmp
wget http://download.virtualbox.org/virtualbox/4.2.4/Oracle_VM_VirtualBox_Extension_Pack-4.2.4-81684.vbox-extpack
VBoxManage extpack install Oracle_VM_VirtualBox_Extension_Pack-4.2.4-81684.vbox-extpack

Make sure you execute the command above using root privilege.

How to install VirtualBox on ClearOS 6.3

How to install VirtualBox on ClearOS 6.3

This tutorial will show you how to install VirtualBox on a ClearOS 6.3 system. Virtualbox can be easily installed on ClearOS 6.3 without a problem. But, you will only see the headless (command mode) of Virtualbox instead of ordinary Virtualbox GUI.

Steps to install Virtualbox on ClearOS 6.3

After ClearOS 6.3 is installed and work properly, you can start installing Virtualbox. I assume you have a good internet connection to do this tutorial. This is the modified version of the original tutorial shown on Howtofoge.com. http://www.howtoforge.com/vboxheadless-running-virtual-machines-with-virtualbox-4.1-on-a-headless-centos-6.2-server

Open Terminal and follow these steps below.

A. Create new admin user

groupadd admin
useradd -d /home/admin -m -g admin -s /bin/bash admin

B. Install Virtualbox

yum groupinstall 'Development Tools'
yum install SDL kernel-devel kernel-headers dkms

In my case, I still need to install gcc manually so I add this command

yum install gcc


How to install Webmin 1.610 on Ubuntu Server 12.10

Webmin is a must have application for server administrator. Webmin can help us manage and administer many things on an Ubuntu server via remote web interface. For more information about webmin, please visit the official webmin page. The latest version of Webmin when I write this post is webmin 1.610. It has a better and nicer look compared to previous version.

webmin-ubuntu

How to install Skype on OpenSUSE 12.2

How to install Skype on OpenSUSE 12.2

Now it's the time to install the latest Skype 4.1.0 on OpenSUSE 12.2. Skype 4.1.0 for Linux brings a lot improvements. In order to install Skype on OpenSUSE, please download the latest version of Skype 4.1 for OpenSUSE from this link.

After download, you will have a file called: skype-4.1.0.20-suse.i586.rpm. Now we are ready to install it.

Open Terminal or Konsole and type this command

cd /home/dhani/Downloads      ===== this is the download location

rpm -ivh skype-4.1.0.20-suse.i586.rpm

If you got no errors, Skype is now should be ready. If you tried to install it on OpenSUSE 12.2 on 64bit system, you will get the following error

dhani@linux-m5a4:~/Downloads> rpm -ivh skype-4.1.0.20-suse.i586.rpm
error: Failed dependencies:
        libQtCore.so.4 is needed by skype-4.1.0.20-suse121.i586
        libQtDBus.so.4 is needed by skype-4.1.0.20-suse121.i586
        libQtGui.so.4 is needed by skype-4.1.0.20-suse121.i586
        libQtNetwork.so.4 is needed by skype-4.1.0.20-suse121.i586
        libQtWebKit.so.4 is needed by skype-4.1.0.20-suse121.i586
        libQtXml.so.4 is needed by skype-4.1.0.20-suse121.i586
        libXv.so.1 is needed by skype-4.1.0.20-suse121.i586
        libpng12-0 is needed by skype-4.1.0.20-suse121.i586


To solve it, we need to install those packages first and re execute the rpm -ivh command above.

How to install Guest Additions on Kubuntu 13.04 Alpha 1

On my own experience, Kubuntu 13.04 Alpha 1 can be installed through Virtualbox easily. There was no problem when I tried to install this distro on Virtualbox 4.2.2. As usual, after installing a new distro on my Virtualbox, the next main thing is to install the Guest Additions on the guest system. It's the most important thing since we can get better performance and visualisation after installing Guest Additions. OK here is how to install Virtualbox Guest Additions on Kubuntu 13.04 Alpha 1.

1. Boot the Kubuntu 13.04 Alpha 1 guest machine.

2. Go to Devices | Install Guest Additions on the Virtualbox window

3. If the autorun prompt does not work, you can open or browse the content of the Virtualbox Guest Additions on Kubuntu 13.04.

guest-additions-kubuntu


Kubuntu 13.04 Alpha 1 Screenshots

Kubuntu 13.04 with codename Raring Ringtail is now available for testing. Here I just want to share some screenshots of this new Kubuntu 13.04 Raring RIngtail. It's a pretty Linux distribution that is lightweight, beauty and easy to use.

kubuntu-13-04

Kubuntu 13.04 Desktop

Kubuntu 13.04 Raring Ringtail Alpha 1 is now available

The development version of Kubuntu is now reached version 13.04 Alpha 1. This next Kubuntu uses Raring Ringtail as its codename. So, whats new on this Kubuntu 13.04? Technically, there are a lot of improvements have been made to this version but I will not explain here. You may read the full release not of the Kubuntu 13.04 Alpha 1 here.

kubuntu-13-04


Network configuration on Openfiler server

Network configuration on Openfiler server
After installing Openfiler, the first thing to do is to set up and configure the network connection. By setting the correct network connection, we can easily manage the Openfiler server in the future. OK, lets get this thing done. 
1. Login to the web console of the Openfiler server. Type https://192.168.1.1:446 on your web browser. Change the IP address with your Openfiler server IP address.
2. On the web console, click System tab and you will see the network configuration there.

Tutorial How to install Openfiler

Openfiler is a Linux distribution that was designed for network server. We can easily build a powerful file server using Openfiler. This tutorial will show you how to install Openfiler from the beginning. First you must download the ISO file of the latest version of Openfiler. Boot your computer or virtual machine using the ISO file.
On the first screen press Enter to start the installation wizard.
Install Flash Plugin di Fedora 18 x86_64

Install Flash Plugin di Fedora 18 x86_64

Berikut ini adalah cara Install Flash Plugin di Fedora 18 x86_64 alias Fedora 18 64 bit. Bagi sebagian orang mungkin masih bingung bagaimana cara install Adobe flash plugin yang mudah di Fedora. Simak cara saya install Adobe flash plugin di Fedora 18 64 bit berikut ini.

1. Buka terminal dan jalankan perintah berikut untuk menambahkan Adobe repository ke Fedora 18
rpm -ivh http://linuxdownload.adobe.com/adobe-release/adobe-release-x86_64-1.0-1.noarch.rpm

Cara install CrossOver di Fedora 18

Tutorial Cara install CrossOver di Fedora 18

CrossOver merupakan sebuah aplikasi yang dapat kita gunakan untuk menginstall aplikasi Windows di Linux, misalnya Fedora. CrossOver ini dibuat dengan basis Wine. Tetapi bagi saya, CrossOver lebih baik dari native Wine kalau dilihat dari segi tampilan grafis nya yang terkesan lebih professional. Maklum, CrossOver ini adalah aplikasi komersial yang tidak gratis. Kita bisa download free trial CrossOver ini. 

Langkah install CrossOver di Fedora 18

1. Download file instalasi CrossOver. Silahkan kunjungi website CrossOver dan download dari sana. Dalam tutorial ini saya menggunakan versi installer .bin yang secara teori dapat diinstall di Linux apapun.

How to install VMware Tools on Fuduntu 2012

This is a quick tutorial on How to install VMware Tools on Fuduntu 2012. When we install Fuduntu 2012 on VMware Workstation, we need to install VMware Tools to enable many other features such as full screen and seamless mode, and many other benefits.

Steps to install VMware Tools on Fuduntu 2012

1. Boot Fuduntu guest machine on VMware Workstation. When it reached the desktop, click the Install VMware Tools on the VMware Workstation. Go to VM | Install VMware Tools.

2. The VMware Tools will be mounted on Fuduntu 2012. Extract the compressed file inside. It called VmwareTools-xxxx.tar.gz


vmware-tools-fuduntu-1


Redo Backup & Recovery 1.0.4 is now available

Redo Backup & Recovery 1.0.4 is on the way. We can download this powerful, simple backup and recovery solution for free. Redo Backup & Recovery 1.0.4 is based on Ubuntu 12.04 Precise Pangolin. The core is now upgraded with many additional improvements. Redo Backup & Recovery 1.0.4 can be used to perform a complete system backup, not limited to Linux file system but Windows file system as well.


redo-backup-1.0.4


How to install Gambas 3 on Ubuntu 12.10 Quantal Quetzal

How to install Gambas 3 on Ubuntu 12.10 Quantal Quetzal

Gambas is a simple yet powerful application to build your own application using Basic language. Gambas is not Visual Basic clone but it has many similarities. This tutorial is going to show you how to install Gambas3 on Ubuntu 12.10. Be careful when you try to install this application using the following method. In some cases this does not work because this tutorial was originally written for Ubuntu 12.04 Precise Pangolin.

Steps to install Gambas 3 

Add Gambas 3 repository to Ubuntu
 sudo add-apt-repository ppa:nemh/gambas3

How to install FileZilla 3.6 on Ubuntu 12.10 Quantal Quetzal

How to install FileZilla 3.6 on Ubuntu 12.10 Quantal Quetzal

This tutorial is going to show you How to install FileZilla 3.6 on Ubuntu 12.10 Quantal Quetzal. FileZilla 3.6 includes many improvements and bug fixes. FileZilla is my favorite FTP client application for Linux and Windows. Filezilla can be used to upload and download files from my FTP server (locally or over the internet) easily. 
KVM Virtualization on Ubuntu 12.10 Tutorial

KVM Virtualization on Ubuntu 12.10 Tutorial

If you wan to run virtual machines on top of your Ubuntu 12.10 server, you can use KVM, Virtualbox or some other virtualization software available for Linux. On this tutorial, we are going to show you how to build a powerful kernel-based virtualization system on Ubuntu 12.10 using KVM. KVM stands for Kernel-based Virtual Machine, a good way to build a powerful virtual systems. Please keep in mind, to enable KVM on your system, your processor must have the hardware virtualization feature such as Intel VT or AMD-V.


Read the complete tutorial how to build a powerful KVM Virtualization system on Ubuntu 12.10 server.

Bagaimana cara disable firewall di CentOS 6.3

Bagaimana cara disable firewall di CentOS 6.3

Terkadang kita perlu untuk mematikan fitru Firewall yang ada di CentOS Linux ataupun distribusi Linux yang lain. Adapun cara mudah untuk disable firewall di CentOS adalah sebagai berikut. Saya menggunakan CentOS 6.3 dalam tutorial kali ini.

A. Disable Firewall sementara.

Tolong dicatat, dengan perintah berikut firewall akan kembali ke setting awal ketika komputer atau server reboot.

Buka Terminal dan jalankan perintah berikut

service iptables save
service iptables stop

Install Ubuntu Tweak 0.8.2 on Ubuntu 12.10

Install Ubuntu Tweak 0.8.2 on Ubuntu 12.10

The new version of Ubuntu Tweak 0.8.2 is now released. Here we provide a simple tutorial on how to install Ubuntu Tweak 0.8.2 on Ubuntu 12.10 Quantal Quetzal. Ubuntu Tweak 0.8.2 is now fully supports Ubuntu 12.10. 

Steps to install Ubuntu Tweak 0.8.2

Open Terminal and paste the following command
sudo add-apt-repository ppa:tualatrix/ppa
sudo apt-get update
sudo apt-get install ubuntu-tweak
Enjoy Ubuntu Tweak on Ubuntu 12.10

How to install XBMC Media Center on Kubuntu 12.10

How to install XBMC Media Center on Kubuntu 12.10

xbmc-kubuntu-1

XBMC is a fantastic application that will turn your computer into a Media Center. You can then play your favorite music and movies easily with a nice interface. In order to install XBMC Media Center on your Kubuntu 12.10, you can simply follow these steps below.

How to install Logitech Media Server on CentOS 6.3

How to install Logitech Media Server on CentOS 6.3

Logitech Media Server is a powerful tool to turn your Linux into a multimedia server that serves music and other media to the devices connected to the same network. This tutorial is going to show you how we install Logitech Media Server on a CentOS 6.3 server. I assume you have installed CentOS 6.3.

media-server

How to install Nagios on Oracle Linux 6.3

How to install Nagios on Oracle Linux 6.3

How to install Nagios on Oracle Linux 6.3

After being busy in last few days because of my Forex trading activity, today I want to write a simple tutorial for Oracle Linux 6.3 users. In this post I will show you how to install Nagios on my Oracle Linux 6.3 server. Nagios is a powerful network monitoring tool which provides detailed information about the network and computers connected to the network. See the Nagios website for more information about nagios.

Steps to install Nagios on Oracle Linux 6.3

Ok, login to your Oracle Linux server via Terminal console and search for Nagios package. Use this command as root
yum search nagios
[root@oracle ~]# yum search nagios
Loaded plugins: security
ol6_latest/primary                                       |  20 MB     11:25
ol6_latest                                                          14612/14612
rpmforge                                                 | 1.9 kB     00:00
virtualbox                                               |  951 B     00:00
============================= N/S Matched: nagios ==============================
nagios-devel.i686 : Header files, libraries and development documentation for
                  : nagios
nagios-nrpe.i686 : Nagios Remote Plug-ins Execution daemon
nagios-nsca.i686 : Nagios Service Check Acceptor
nagios-nsca-client.i686 : nagios send_nsca
nagios-plugins.i686 : Host/service/network monitoring program plugins for Nagios
nagios-plugins-nrpe.i686 : Nagios plug-in for NRPE
nagios-plugins-setuid.i686 : Host/service/network monitoring program plugins for
                           : Nagios requiring setuid
perl-Nagios-Object.noarch : Nagios::Object - Nagios object configuration parsing
perl-Nagios-Plugin.noarch : Family of perl modules to streamline writing Nagios
rss4nagios.i686 : Authenticated RSS alerts for nagios
check_logfiles.i686 : Logfile check  plugin for nagios
nagios.i686 : Open Source host, service and network monitoring program
nagstamon.noarch : Nagios status monitor for your desktop
ndoutils.i686 : Nagios plugin to store Nagios data in a relational database
nsc.noarch : Console monitor for Nagios
  Name and summary matches only, use "search all" for everything.
You have new mail in /var/spool/mail/root
How to install Samba on Xubuntu 12.10

How to install Samba on Xubuntu 12.10

How to install Samba on Xubuntu 12.10

This Xubuntu 12.10 tutorial will show you how to install Samba on Xubuntu 12.10. At the end we will have a simple file server using samba on Xubuntu 12.10. Before you go any further, please keep in mind that this is a simple file server which means I do not use domain logon features on Samba. I only use user level authentication that should be sufficient for most SOHO file server. 
Most steps on this tutorial done using command line with root privileges. 

A. Install Samba on Xubuntu 12.10

Install samba using this command below.
apt-get install samba samba-common
Now check and start samba if it not started.
service smbd status
service smbd start

TeamViewer 7 on Xubuntu 12.10

TeamViewer 7 on Xubuntu 12.10

The latest stable version of TeamViewer 7 can be easily installed or run on Xubuntu 12.10 system. In this tutorial, I will show you how to install TeamViewer 7 on Xubuntu 12.10. TeamViewer is a free remote desktop application which can be used to control a computer remotely, over the internet. You can monitor or open your office computer from home, transfer files etc. 

How to install TeamViewer 7 on Xubuntu 12.10

1. Download TeamViewer 7 deb package. For other arch, please visit this page
2. Open Terminal and type the following command to install
sudo dpkg -i teamviewer_linux.deb 

How to upgrade from Xubuntu 12.04 to Xubuntu 12.10

How to upgrade from Xubuntu 12.04 to Xubuntu 12.10

If you want to upgrade the Xubuntu 12.04 into the newer Xubuntu 12.10, you can do this easily. The main thing is you will need a good internet connection to handle the download. I am not sure if it is necessary to upgrade the LTS version (Xubuntu 12.04) into Xubuntu 12.10 but in case you want to, you can do the following steps.
Check list:
1. Make sure all your data have been backed up. 
2. Enable all the official repository
3. Enable the update notification on the Update Manager. To do this, simply open the Update Manager and change the update settings and enable the notification for any new version available. You can read the details here.

How to install Team Viewer on Xubuntu 12.10

How to install Team Viewer on Xubuntu 12.10

This tutorial is going to show you how to install the latest version of Team Viewer on Xubuntu 12.10. Team Viewer is a powerful remote desktop application which let us connect to remote computer using the internet connection. Its not limited to Local network but it can connect to another computer around the world as long as there is internet connection and both computer has Team Viewer installed.

Steps to install Team Viewer on Xubuntu 12.10

1. Download TeamViewer Deb package from the official website. Simply click the link below and save the file to your local directory
2. Install the file
Things to do after installing Xubuntu 12.10

Things to do after installing Xubuntu 12.10

Things to do after installing Xubuntu 12.10

On my previous post, I've posted 5 things to do after installing Kubuntu 12.10. Now, its time to post the similar 4 things to do after installing Xubuntu 12.10. Xubuntu has the same "core" with Kubuntu. The main difference is that Kubuntu is using KDE desktop while Xubuntu uses Xfce. Xubuntu is much lighter and faster compared to Kubuntu (at least on my computer..he he). OK, these are few things I do after I installed my Xubuntu 12.10.

These are things I do after installing Xubuntu 12.10

1. Install Adobe Flash Player
As always, I cannot get rid of Adobe flash plugin. This is an essential application for my computes. Adobe Flash Player is needed by Xubuntu to play multimedia content on a website, play flash enabled animation or video etc. Read how I install Adobe Flash Plugin on Xubuntu 12.10.

Dropbox repository for Ubuntu 12.04, Linux Mint 13

Dropbox repository for Ubuntu 12.04, Linux Mint 13

Installing Dropbox on Ubuntu based Linux is now made easy. Now, we can add the Dropbox repository to Ubuntu and start installing Dropbox using apt-get command. This method applied to Ubuntu based Linux such as Linux Mint, Deepin Linux, Xubuntu, Kubuntu, Pear Linux and many others.

To add Dropbox repository to Ubuntu, you can follow these steps.

Open Terminal and paste this command to add the Dropbox public key to your system

sudo apt-key adv --keyserver pgp.mit.edu --recv-keys 5044912E

Now paste this command to add the repo

sudo add-apt-repository "deb http://linux.dropbox.com/ubuntu $(lsb_release -sc) main"

How to install Adobe PDF Reader on Linux Mint 13

How to install Adobe PDF Reader on Linux Mint 13

By default, Linux Mint 13 is equipped with a handy PDF reader. But, in case you need another alternative, you can easily install the latest Adobe Acrobat PDF Reader on Linux Mint 13. Adobe Reader comes with a simple and pretty cool interface almost the same as Windows version.  In Adobe Reader you can print and comment on pdf documents. It's the only PDF file reader which can open and interact with all type of PDF content including multimedia and forms.

How to install Subsonic music streamer on Fedora 16

How to install Subsonic music streamer on Fedora 16

This tutorial will show you how to install Subsonic into Fedora 16. Subsonic is a simple multimedia server which will help you to turn Fedora Linux into a powerful music streamer for your network. The latest Subsonic version 4.7 is available in rpm binary that can be easily installed to Fedora Linux. Subsonic comes with an intuitive web GUI. So we can manage the server remotely using a web browser.

Here's how to install Subsonic music streamer on Fedora 16.

Requirements:

Subsonic requires Java tobe installed on the server. You can read here how to install Java on Fedora 16.

Install Subsonic to Fedora 16

Download Subsonic rpm file

http://www.subsonic.org/pages/download2.jsp?target=subsonic-4.7.rpm

Now install the file

rpm -i subsonic-4.7.rpm

How to enable add-apt-repository command on Xubuntu

How to enable add-apt-repository command on Xubuntu


How to enable add-apt-repository command on Xubuntu

By default, Xubuntu does not supports add-apt-repository command. If you try to use this command, you will get such errors like this one below:
xubuntu@xubuntu:~$ sudo add-apt-repository ppa:x2go/stable
Traceback (most recent call last):
  File "/usr/lib/python3/dist-packages/softwareproperties/ppa.py", line 98, in get_ppa_info_from_lp
    lp_page = urllib.request.urlopen(request, cafile=LAUNCHPAD_PPA_CERT)
  File "/usr/lib/python3.2/urllib/request.py", line 139, in urlopen
    return opener.open(url, data, timeout)
  File "/usr/lib/python3.2/urllib/request.py", line 370, in open
    response = self._open(req, data)
  File "/usr/lib/python3.2/urllib/request.py", line 388, in _open
    '_open', req)
  File "/usr/lib/python3.2/urllib/request.py", line 348, in _call_chain
    result = func(*args)

How to disable SELINUX on Fedora 17

How to disable SELINUX on Fedora 17

How to disable SELINUX on Fedora 17

Just a quick note here, I want to show you How to disable SELINUX on Fedora 17. But in some cases, disabling the SELINUX will cause security issues. Please do this if you are sure and need to. On Fedora 17, open Terminal and execute this command to edit the SELINUX config file
nano /etc/selinux/config
On the SELINUX line, change it to disabled as follow.


# This file controls the state of SELinux on the system.
# SELINUX= can take one of these three values:
#     enforcing - SELinux security policy is enforced.
#     permissive - SELinux prints warnings instead of enforcing.
#     disabled - No SELinux policy is loaded.
SELINUX=disabled
# SELINUXTYPE= can take one of these two values:
#     targeted - Targeted processes are protected,
#     minimum - Modification of targeted policy. Only selected processes are protected.
#     mls - Multi Level Security protection.
SELINUXTYPE=targeted

Now reboot Fedora 17. 

How to add new share on ClearOS 6.3 Server

How to add new share on ClearOS 6.3 Server

This quick tutorial will show you how to add new share on ClearOS 6.3 so it can be accessed from other computers.

First, login to ClearOS 6.3 web interface and click on Flexshare. On the flexshare tab, press Add and enter the new share folder details as follow

add share


How to install phpvirtualbox on ClearOS 6.3 server

Phpvirtualbox is the web GUI to manage the headless Virtualbox installed on ClearOS 6.3. Read our previous tutorial on how to install virtualbox 4.2 on ClearOS 6.3 server. phpvirtualbox enable us to create, edit, delete or view the guest host console via web browser. It’s a pretty cool to view virtualbox on a web browser.

phpvirtualbox-1

This tutorial is going to show you how to install and configure phpvirtualbox on ClearOS 6.3 server. I assume you have installed the latest Virtualbox 4.2 on ClearOS 6.3.

Login as root.

su

Install Ntop Network Monitoring on Xubuntu 12.10

Install Ntop Network Monitoring on Xubuntu 12.10

Ntop is a lightweight network monitoring for Linux system which can be installed easily on Ubuntu based Linux such as Xubuntu 12.10. This tutorial will show you how to Install Ntop Network Monitoring on Xubuntu 12.10. I am running Xubuntu 12.10 on my Local Area Network which consist of about 20 computers. Ntop provides detailed information about the LAN traffic and also the internet traffic pretty nicely.

ntop-xubuntu-12.10-3

Each hosts on my LAN is listed on its web interface, so we can gain information for each hosts including UDP, TCP data connections, network load etc.

ntop-xubuntu-12.10-4


How to install semanage on CentOS 6.3

How to install semanage on CentOS 6.3

In CentOS or other Red Hat Linux derivatives, if SELinux is enabled and we want to add exception to a given port, we can use the “semanage” command. But, on CentOS 6.3 semanage is not installed by default. We can easily install semanage using the following command:

yum install policycoreutils-python


Dependencies Resolved

================================================================================
Package                     Arch      Version                  Repository
                                                                           Size
================================================================================
Installing:
policycoreutils-python      i686      2.0.83-19.24.el6         base      338 k
Installing for dependencies:
audit-libs-python           i686      2.2-2.el6                base       57 k
libcgroup                   i686      0.37-4.el6               base      102 k
libsemanage-python          i686      2.0.43-4.1.el6           base       80 k
setools-libs                i686      3.3.7-4.el6              base      400 k
setools-libs-python         i686      3.3.7-4.el6              base      210 k
Updating for dependencies:
audit                       i686      2.2-2.el6                base      225 k
audit-libs                  i686      2.2-2.el6                base       60 k
policycoreutils             i686      2.0.83-19.24.el6         base      641 k

Transaction Summary
================================================================================
Install       6 Package(s)
Upgrade       3 Package(s)

Total download size: 2.1 M
Is this ok [y/N]: y

How to install Virtualbox 4.2 on Clear OS 6.3 Server

How to install Virtualbox 4.2 on Clear OS 6.3 Server

ClearOS is a perfect server appliance built on top of CentOS Linux. It has many features such as active directory, LDAP server, file server, gateway and many more. On this tutorial, I will show you how to install Virtualbox 4.2 on ClearOS 6.3.

1. Add RPMForge repository to ClearOS

You can follow this guide to install or enable the RPMForge repository to ClearOS 6.3


2. Install Virtualbox.

Execute these commands as root.

yum groupinstall “Development Tools”
yum install SDL kernel-devel kernel-headers dkms


Local Area (LAN) Messenger using iptux on Ubuntu 12.10

When I was using MS Windows, I found a nice LAN (Local Area Network) Messenger application which can be used to chat and transfer files to other users on the same network. But unfortunately the application is not free. But when I switch to Linux (Ubuntu), I found the similar application called iptux. iptux is a powerful, simple LAN messenger for Linux. The interface of iptux is similar to pidgin (internet messenger). But iptux cannot be used to communicate with other users via internet.


iptux-1

The most beautiful Ubuntu based Linux Distribution on the wild

Hi, see you again on my blog. On this post, I just want to write about my own experiences when trying several Linux distributions. There are many Linux flavors available on the wild but to me, only some of them are comes with a user friendly interface. Here I will give a short review about the most beautiful Linux distribution on the wild that based on Ubuntu. This review is based on my own experiences and no other tendency at all. So, it could be different with you or any other Linux users. 

The most beautiful Linux Distribution 

1. Pear Linux 6
Pear Linux 6 is based on Ubuntu 12.04.1 and it comes with a fresh desktop and dock. Slightly, Pear Linux 6 is more like a Mac OS X. I am not sure if the developer is trying to mimic Mac OS X on this distribution. Pear Linux 6 is beautiful and easy enough for a new Linux users or a switching Windows users. 

Oracle Linux 6.3 Installation Tutorial–Basic Server

This tutorial is going to show you step by step installation of Oracle Linux 6.3 as a basic server. This means, I want to install the Oracle Linux as a server without any GUI or Xserver. It’s a good installation mode for server purposes. For example for file server, web server which does not requires GUI access. OK, now lets prepared.

Steps to install Oracle Linux 6.3 Basic Server

On the first boot select install Oracle and you will see this menu after it. Press next to proceed.


oracle-minimal-install-1


Install Skype on Xubuntu 12.10

Install Skype on Xubuntu 12.10

Hi, see you again on Xubuntu 12.10 tutorial. This time I will show you how to install Skype on my Xubuntu 12.10. Skype is  now listed on Canonical partner repository. So, we can easily add the repository for Skype to Xubuntu 12.10

Steps to install Skype on Xubuntu 12.10

Add the repository
sudo add-apt-repository "deb http://archive.canonical.com/ $(lsb_release -sc) partner"

Install Java Runtime Environment on Xubuntu 12.10

Install Java Runtime Environment (JRE) on Xubuntu 12.10

This tutorial will guide you to the process of install Java Runtime Environment (JRE) on Xubuntu 12.10 system. The latest version of Oracle Java JRE can be obtained here. This tutorial will install Java on system and also create symbolic link java library. In other word, we will also enable the Java plugin for Mozilla Firefox, Google Chrome and other web browser under Xubuntu 12.10. I am sorry but I am no the fan of OpenJDK JRE. I think Oracle Java is better than OpenJDK. :) 
OK. Lets get started. 
First, use this link to download the latest available Java package for your computer (32 bit or 64 bit). In this tutorial, I am using the jre 7 update 9 for Linux 32 bit (tar.gz). Save the file jre-7u9-linux-i586.tar.gz to your computer.
Next, extract the file using command. Change the command if you have newer or any other java version.
tar xzvf jre-7u9-linux-i586.tar.gz

How to play MP3 and DVD video on Xubuntu 12.10

How to play MP3 and DVD video on Xubuntu 12.10

How to play MP3 and DVD video on Xubuntu 12.10

By default, we cannot play MP3 or DVD movie on standard installation of Xubuntu 12.10. We need to install additional packages in order to play MP3 and some others audio video formats on Xubuntu 12.10. Xubuntu, as well Ubuntu does not includes the multimedia codecs to play MP3. But we can easily install ubuntu-restricted-extras to enable supports to various audio and audio file formats. This command will also install flash player on Xubuntu 12.10 as well.
sudo apt-get install ubuntu-restricted-extras
After the installation finished, you can start playing your favorite MP3 and other video formats on Xubuntu 12.10. Enjoy.
How to enable RPMForge repo on ClearOS 6.3

How to enable RPMForge repo on ClearOS 6.3

How to enable RPMForge repo on ClearOS 6.3

This short tutorial will show you how to install or enable the RPMForge repository on ClearOS 6.3. ClearOS is a CentOS based Linux so, it RPMForge can be setup easily. In order to setup the RPMForge on ClearOS, follow these instructions below:

Open Terminal and do the following.

wget http://packages.sw.be/rpmforge-release/rpmforge-release-0.5.2-2.el6.rf.i686.rpm
rpm --import http://apt.sw.be/RPM-GPG-KEY.dag.txt
rpm –i rpmforge-release-0.5.2-2.el6.rf.i686.rpm

Now RPMForge is enabled on ClearOS and we can start using it right away.

How to install XBMC Media Center on Xubuntu 12.10

How to install XBMC Media Center on Xubuntu 12.10

This tutorial is going to show you how to install XBMC Media Center on Xubuntu 12.10 Quantal Quetzal. XBMC is a free and powerful application that will turn your Xubuntu 12.10 into a rich features multimedia center for your home. For more information about XBMC and its features, please visit the official website of XBMC

How to install Truecrypt on CentOS 6.3

How to install Truecrypt on CentOS 6.3

This tutorial is going to show you how to install Truecrypt on CentOS 6.3. Truecrypt is a powerful utility that can help you to encrypt file or folder or even a partition easily. Truecrypt comes with a simple and easy to use user interface.

Steps to install Truecrypt on CentOS 6.3

1. Download Truecrypt package. Or use wget instead

wget http://www.truecrypt.org/download/truecrypt-7.1a-linux-x86.tar.gz

2.  Now extract the package

tar xzvf truecrypt-7.1a-linux-x86.tar.gz


How to install Google Chrome on CentOS 6.3

How to install Google Chrome on CentOS 6.3

How to install Google Chrome on CentOS 6.3

This quick tutorial is going to show you how to install Google Chrome on CentOS 6.3. This also applied for CentOS 6.2 as well. By installing Google Chrome via YUM repository, we can get future update easily.  First, we need to add Google Chrome repository to CentOS 6.3.

Edit or create new file on /etc/yum.repos.d/google-chrome.repo. You can do this by invoking this command as root

nano /etc/yum.repos.d/google-chrome.repo

Now paste the following lines

for 32bit system:

[google-chrome]
name=google-chrome - 32-bit
baseurl=http://dl.google.com/linux/chrome/rpm/stable/i386
enabled=1
gpgcheck=1
gpgkey=https://dl-ssl.google.com/linux/linux_signing_key.pub

How to install Ubuntu Tweak 0.8.1 on Ubuntu 12.10

How to install Ubuntu Tweak 0.8.1 on Ubuntu 12.10

After a shocking announcement of the discontinued of Ubuntu Tweak development, now Ubuntu Tweak fans can breath again. Chou, the Ubuntu Tweak developer is back and promise will continue the development on Ubuntu Tweak. This tutorial is going to show you how to install Ubuntu Tweak 0.8.1 on Ubuntu 12.10 Quantal Quetzal. The new version of Ubuntu Tweak 0.8.1 is now ready and supports Ubuntu 12.10.

Steps to install Ubuntu Tweak on Ubuntu 12.10

Add the official Ubuntu Tweak PPA repository. Edit the /etc/apt/sources.list and add the following lines:
deb http://ppa.launchpad.net/tualatrix/ppa/ubuntu quantal main
deb-src http://ppa.launchpad.net/tualatrix/ppa/ubuntu quantal main 

Install Cairo Dock 3.1.0 on Ubuntu 12.10

Install Cairo Dock 3.1.0 on Ubuntu 12.10

Install Cairo Dock 3.1.0 on Ubuntu 12.10

This tutorial is going to show you how to install the latest stable version of Cairo Dock 3.1.0 on Ubuntu 12.10 Quantal Quetzal. This new Cairo Dock 3.1.0 comes with many improvements.
Here are some new features included on Cairo Dock 3.1.0. 
  • Better integration of Unity: support of the Launcher API and better support of indicators
  • All configuration windows have been merged into a single one.
  • Added progress bars in several applets and in the Dbus API
  • The Music Player applet can control players in the systray.
  • Icons of the taskbar can be separated from launchers or not
  • The advanced mode of the configuration panel has been improved (thanks to SQP!)
  • Messaging Menu has been rewritten for newer versions and two new 'indicator' applets have been added:
    • Printers-Menu: it shows active print jobs.
    • and Sync-Menu: e.g. on Ubuntu 12.10, it collects status information data from processes that involve some form of synchronisation with servers; such as about apps like Ubuntu One.
  • And as always ... various bug fixes and improvements

Install Flash Plugin on Ubuntu 12.10 Quantal Quetzal

How to Install Flash Plugin on Ubuntu 12.10 Quantal Quetzal

This tutorial is going to show you how to Install Flash Plugin on Ubuntu 12.10 Quantal Quetzal. Flash Plugin is a must have application for Ubuntu users. Flash plugin is required by Firefox and Google Chrome to play rich multimedia contents such as playing YouTube videos etc. In order to install Flash Plugin on Ubuntu 12.10 you can do the following steps.
A. Enable the multiverse repository 
Make sure you enable the multiverse repository from Software Sources. 

How to install Deepin Software Center on Kubuntu 12.10

How to install Deepin Software Center on Kubuntu 12.10

To install or uninstall software on Kubuntu 12.10, you can use the default Software Center on Kubuntu 12.10. But, if you need a fancy one, I recommend you to install the Deepin Software Center on Kubuntu 12.10. Deepin Software Center is a simple, nice looking and easy to use software manager. See the screenshots of my Deepin Software Center on my Kubuntu 12.10

deepin-software-center-1

How to install Skype 4.0.0.8 on Mandriva 2012

How to install Skype 4.0.0.8 on Mandriva 2012

This tutorial is going to show you how to install Skype on Mandriva 2012. Current version of Skype for Linux is 4.0.0.8. Skype is available in various platform and on this tutorial, I am trying to install Skype on Mandriva 2012 using the dynamic version. I am not sure what is the differences between dynamic, static and other packages. Skype is the most popular VoIP app for Linux which lets us make free phone calls, chat, video chat, send files to our skype friends. 

Steps to install Skype on Mandriva 2012

1. Download Skype package
You can obtain the Skype dynamic package from this link: http://download.skype.com/linux/skype-4.0.0.8.tar.bz2

Linux for Beginner:Introduction to Deepin Linux 12.06 part 1

Switching from Windows to Linux now made easier with the release of some user oriented Linux such as Deepin Linux 12.06, an Ubuntu based Linux which is nice and good for a new Linux users. Here I will try to give a quick walkthrough to the new Deepin Linux 12.06. The Deepin Linux 12.06 desktop features a clean Gnome 3 interface. Many applications in several categories are included on this Linux.

How to open installed software on Deepin Linux

If you want to open installed software on Deepin Linux 12.06, move your cursor to the top left of your desktop. Click the Deepin Logo. Click the Application tab to see the software in several categories.

deepin-1

Configure NFS Server on FreeNAS 8.3.0

This quick tutorial is going to show you how to configure NFS Server on FreeNAS 8.3.0. Network File System (NFS) is a distributed file system protocol originally developed by Sun Microsystems in 1984,[1] allowing a user on a client computer to access files over a network in a manner similar to how local storage is accessed. NFS, like many other protocols, builds on the Open Network Computing Remote Procedure Call (ONC RPC) system. (Wiki) FreeNAS has a built in tool that help us to configure the NFS Server easily.

Steps to Configure NFS Server on FreeNAS 8.3.0

1. Login to FreeNAS web config GUI

2. Go to Services and turn ON the NFS service from that page.

3. Now go to Sharing >> Unix(NFS)Share>>Add Unix (NFS) Share

nfs-server


Why Ubuntu Tweak development stops?

I just read  a news on Softpedia about the surprising Ubuntu Tweak development stop. I was thinking why Ubuntu Tweak development stops mysteriously. Is it because of further funding problems? There are no clear information left by the developer before he made this decision but here is the last word we can read from the official blog.

ubuntu-tweak-stop

“You may ask why I made this decision to stop the development of Ubuntu Tweak, I may write 10,000 words to describe how I start this project, how I feel happy from this project, how I feel bad from this project…But I just want to say: If making free software is not free any more, why still doing this?” stated the developer on his blog.

I regret this decision personally but this is his decision. He build this project from zero until now. He felt it was not  worth anymore to continue the project. So, thank you and good luck for you, Ubuntu Tweak developer.

5 Things I do after installing Kubuntu 12.10

5 Things I do after installing Kubuntu 12.10

I do love Kubuntu 12.10 for both the user interface/experiences and the overall performance. With the power of Ubuntu 12.10 and the easiness of KDE. As far as I know, Kubuntu could be the most user friendly desktop Linux at the moment. And after I installed Kubuntu 12.10 on my system, here are 5 things I do. This article is suitable for general Linux desktop users not for network administrator or multimedia enthusiast.

1. Install Flash Plugin on Kubuntu 12.10

Since Kubuntu 12.10 does not equipped with flash plugin or flash player by default, I need to install it on my Kubuntu 12.10. Read this post on how to install flash plugin on Kubuntu 12.10 if you want.

2. Install Google Chrome

I do not like the default web browser on Kubuntu (Rekonq) or even the Mozilla Firefox. I prefer Google Chrome as my web browser to handle all my web browsing activities. Google Chome has a simple interface and works perfectly on Kubuntu. Read how to install Google Chrome on Kubuntu 12.10

Install Oracle Java 7 Update 9 on Kubuntu 12.10

This tutorial is going to show you how to Install Oracle Java 7 Update 9 on Kubuntu 12.10. Java is a must have application for Linux users. Enrich your browsing activity with Oracle Java 7 update 9. If you still use the older version of Oracle Java, I recommend you to upgrade to this new release.

Steps to install Oracle Java 7 on Kubuntu 12.10

1. Download Oracle Java 7 update 9 for Linux. For more options for downloading Java, please visit this page: http://java.com/en/download/manual.jsp#lin

2. Extract the package we’ve just downloaded


tar xzvf jre-7u9-linux-i586.gz


It will produces a new directory


jre1.7.0_09


Tutorial how to install PlayonLinux on Kubuntu 12.10

PlayOnLinux is a special application for Linux that can be used to help us to install and run many Windows software on Linux. PlayOnLinux is related to Wine in term of program similarity and other factors. PlayOnLinux offers better and easier way to install Windows software on Linux. We can browse the software we want to install or simply provide the executable file.

playonlinux-kubuntu-1

Steps to install PlayOnLinux on Kubuntu 12.10.


Create Kubuntu 12.10 Live USB from Windows

Create Kubuntu 12.10 Live USB from Windows

There are many applications to create Linux Live USB such as Unetbootin, YUMI, Linux Live USB Creator and some others. But on this case, I highly recommend you (the Windows users) to create Kubuntu 12.10 Live USB using Linux Live USB (LiLi). I have been testing to create Kubuntu 12.10 Live USB with Linux Live USB creator and I can enable the persistent mode on it. It’s a good applications for Windows users that wants to try Linux but don’t want to install on the hard disk.

Steps to create Kubuntu 12.10 Live USB

  • Open Linux Live USB (LiLi). You can download Linux Live USB latest version if you don’t have it. 
  • Choose your USB flash disk from the list. At this point, you must plugged your USB in already
  • Choose a source. It can be ISO, CD or you can directly download from the internet.
  • Set the Persistent mode. You can specify the amount of the persistent space by moving the slider.
  • Finally, press the lightning button to start create Kubuntu 12.10 Live USB.

This method has been tested by me and I can run my Kubuntu 12.10 Live USB with persistent mode. I can save my files and the settings on Kubuntu into the flash disk. Thank you I hope this post is useful for you.

How to install Cinnamon on Kubuntu 12.10

My first question after installing Kubuntu 12.10 was can I install Cinnamon on Kubuntu 12.10? The answer is YES. We can easily install Cinnamon 1.6.2 on Kubuntu 12.10. This tutorial is going to show you how to install Cinnamon on Kubuntu 12.10. Cinnamon is a pretty desktop for Linux and Cinnamon is may favorite desktop manager currently.

install cinnamon on kubuntu

Steps to install Cinnamon 1.6.2 on Kubuntu 12.10

1. Edit file /etc/apt/sources.list and add the following lines:

deb http://ppa.launchpad.net/gwendal-lebihan-dev/cinnamon-stable/ubuntu quantal main
deb-src http://ppa.launchpad.net/gwendal-lebihan-dev/cinnamon-stable/ubuntu quantal main


Kubuntu 12.10 Screenshots Preview

Kubuntu 12.10 Screenshots Preview

Personally I do love the new interface of Kubuntu 12.10. Its a pretty cool Linux distribution. The font, wallpaper and all other designs are match, easy to use. Hmm....perfecto. Kubuntu is based on Ubuntu but Kubuntu 12.10 is way better than Ubuntu 12.10 itself, at least for me. Here are some Kubuntu 12.10 screenshots.
Kubuntu 12.10 Desktop
Akhirnya Kubuntu 12.10 bisa full screen di Virtualbox 4.2.2

Akhirnya Kubuntu 12.10 bisa full screen di Virtualbox 4.2.2

Setelah mengalami kebingungan sejenak ketika menginstall Kubuntu 12.10 di Virtualbox 4.1.22, kini Kubuntu 12.10 saya bisa berfungsi dan berjalan dengan sempurna di Virtualbox 4.2.2. Apabila anda install Kubuntu 12.10 di Virtualbox versi lebih lama dari 4.2.2, kemungkinan anda tidak bisa full screen dan mendapatkan resolusi lebih tinggi dari 1024 x 798 dan Kubuntu tidak bisa auto resize ketika window Virtualbox di resize.

How to install Opera 12.02 on Kubuntu 12.10

How to install Opera 12.02 on Kubuntu 12.10

This tutorial is going to show you how to install Opera 12.02 on Kubuntu 12.10. Opera is a fast web browser for Linux and its a good alternative to Google Chrome of Mozilla Firefox. I am going to show you how to install Opera 12.02 on Kubuntu 12.10 using command line. 

Steps to install Opera 12.02 on Kubuntu 12.10

1. Download Opera 12.02 Deb package
wget http://get-ice-1.opera.com/pub/opera/linux/1202/opera_12.02.1629_i386.deb

How to install Flash Plugin on Kubuntu 12.10

How to install Flash Plugin on Kubuntu 12.10

Kubuntu 12.10 does not equipped with flash plugin by default. We need to install the flash plugin on Kubuntu 12.10 manually. Don't worry, I am going to show you how to install Flash Plugin on Kubuntu 12.10. Flash plugin is an essential additional software needed to play multimedia content on Kubuntu and other Linux. Without flash, you won't be able to play YouTube video on Kubuntu 12.10

Steps to install Flash Plugin on Kubuntu 12.10

1. Enable Multiverse repository on Kubuntu
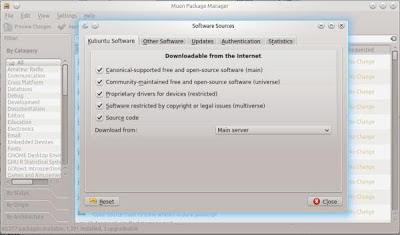
flashplugin-installer is located on multiverse repository. So, make sure the multiverse repo is enabled on Kubuntu 12.10. Open Muon Package manager >>Settings>>Configure Software Source. Tick the multiverse repo on that page to enable. Press close to reload.
How to install Google Chrome on Kubuntu 12.10

How to install Google Chrome on Kubuntu 12.10

This tutorial is going to show you How to install Google Chrome on Kubuntu 12.10 via Google repository. The benefit of using Google repository is we can easily get the updated version of Google Chrome in the future. Also, the dependency files will be automatically resolved and installed on Kubuntu 12.10.

Steps to install Google Chrome on Kubuntu 12.10

1. Add Google repository to Kubuntu 12.10. To add Google repo to Kubuntu 12.10, edit the file /etc/apt/sources.list and add the following line to it
Guest Additions on Kubuntu 12.10 errorโ€“Fixed

Guest Additions on Kubuntu 12.10 error–Fixed

I was installing Kubuntu 12.10 on Virtualbox 4.1.22 and then I tried to install Virtualbox Guest Additions on Kubuntu 12.10 but I cannot get any better resolution greater than 1024 x 798. Actually the Guest Additions can be installed but cannot get the resolution working. Now, after I install the latest Virtualbox 4.2.2, this problem was fixed. So, the I can now run my Kubuntu 12.10 in seamless mode, and auto resize screen resolution.

Uncomplete Guest Additions installation on Kubuntu 12.10

Hi, I just show you how to install Kubuntu 12.10 on a Virtualbox. By default, Kubuntu 12.10 does not equipped with Virtualbox Guest Additions. So, after we install it on Virtualbox we need to install the guest additions manually. I was trying to install Guest Additions on my Kubuntu 12.10 using the standard Kubuntu guest addition installation procedures. The result is as follow:

The guest additions is installed without problems but at the end of the message, I got a confirmation like this:

Unknown version of X window system installed. Not installing X window system driver

I installed guest additions on Kubuntu using the following method. Did I miss something here?.

Steps to install Guest Additions on Kubuntu 12.10

1. Open Terminal and install build-essential

sudo apt-get install build-essential module-assistant
sudo m-a prepare;

2. Now mount the Virtualbox Guest Additions. Go to Devices >> Install Guest Additions. Open Dolphin and open the mounted virtualbox guest additions medium. See illustration below.

guest-additions-kubuntu-1

3. Now, click autorun.sh and provide your root password to continue.

Maybe I need to wait until the new version of Virtualbox is released.

Kubuntu 12.10 Installation Tutorial

The new version of Kubuntu 12.10 Final release is available. Here I will show you how to install Kubuntu 12.10 step by step. Kubuntu 12.10 is a pretty nice Linux for desktop. I think Kubuntu team have done pretty well job here. I like the clean interface, nice and crisp icons and fonts selection. 

Steps to install Kubuntu 12.10

1. Boot your computer using Kubuntu 12.10 ISO. You can create a Live USB if you want to save a CD. 
2. On the first boot screen select Install Kubuntu or Try Kubuntu and we install from desktop.
Download Xubuntu 12.10

Download Xubuntu 12.10

Xubuntu 12.10 is now available for download. Here we provide the direct download link  for the Xubuntu 12.10 ISO. Xubuntu is an Ubuntu based Linux distribution with Xfce desktop manager. Xubuntu 12.10 Quantal Quetzal is a lightweight and fast Linux distribution that can be installed on a low power PC or notebook.

Xubuntu 12.10 features the following:

  • Xubuntu now uses Xfce 4.10 (up from 4.8 in previous release)
  • Completely rewritten offline documentation
  • In the application menu, all settings-related launchers are now grouped under the Settings Manager
  • Updated artwork, including new wallpaper, documentation looks and updates to LightDM, Greybird and Ubiquity slideshow

Download Xubuntu 12.10 ISO

Ubuntu 12.10 Final Release

Another good news for Ubuntu lovers and Linux fans in general. The new Ubuntu 12.10 Final version is now available for download. Ubuntu 12.10 with codename Quantal Quetzal is the latest stable version of Ubuntu, the most popular Linux distribution. Ubuntu 12.10 introduces innovations that bring together desktop and cloud-based experiences, representing the next stage in the transition to a multi-device, cloud-based world. As always Ubuntu available for both 32 bit and 64 bit computer.

ubuntu 12.10 final


How to fix error Metadata file does not match checksum on Oracle Linux 6.3

I was trying to install a package on my Oracle Linux 6.3. The system is updating the repository but at the end of the process I got the following process: Metadata file does not match checksum. Trying another mirror. But as a result, I cannot continue to install any packages.


metadata error

I’ve tried to fix it using command

yum clean metadata

But this problem exist. How can I fix this??

Pear Linux 6 Final Version is out

Good news for Pear Linux fans. The latest stable version of Pear Linux 6 is now out. Please welcome the new Pear Linux 6 Final Version. Personally, Pear Linux 6 is the most beautiful Linux distribution ever made. Its very easy to use, easy to install software, and looks great. I prefer Pear Linux than any other big distro such as Ubuntu, CentOS, Fedora.

pear-linux-6-final


How to install VLC Media Player on Pear Linux 6

This is a quick tutorial to install VLC Media Player on Pear Linux 6. The new version of VLC 2.0.4 is now available for several operating systems. We can easily install VLC on Pear Linux via command line or via Pear AppStore.

Requirements:

In order to install VLC on Pear Linux 6 we need to enable the universe repository first. Open /etc/apt/sources.list to enable the universe repository.

sudo nano /etc/apt/sources.list

Remove the # sign next to universe repository.

vlc on pear


How to install Virtualbox 4.2 on Oracle Linux 6.3

How to install Virtualbox 4.2 on Oracle Linux 6.3

This tutorial is going to show you how to install Virtualbox 4.2 on Oracle Linux 6.3. Since Oracle is an RPM based Linux, we can use the Virtualbox RPM version to be installed on Oracle. Oracle itself is a powerful Linux distribution for both server and desktop.

Steps to install Virtualbox on Oracle Linux 6.3

1. Download Virtualbox 4.2 on Oracle Linux 6.3

Install Cinnamon on Xubuntu 12.04

Install Cinnamon on Xubuntu 12.04

Install Cinnamon on Xubuntu 12.04

I was trying to Install Cinnamon on Xubuntu 12.04. Cinnamon is currently my favorite desktop environment on Linux better than Gnome 3 or Unity. I am not sure if this method will success installing Cinnamon on Xubuntu. I was successfully installed Cinnamon 1.6 on my Ubuntu 12.04 and Fedora 16 as well.

This is the way I install Cinnamon on Xubuntu 12.04

Step 1. Add Cinnamon repository to the system. Edit /etc/apt/sources.list first.
nano /etc/apt/sources.list
And add the following lines to it
deb http://ppa.launchpad.net/gwendal-lebihan-dev/cinnamon-stable/ubuntu precise main
deb-src http://ppa.launchpad.net/gwendal-lebihan-dev/cinnamon-stable/ubuntu precise main 
Step 2. Update system
sudo apt-get update

BlankON 8.0 Sajadah is now available

Good news for Indonesian Linux community. The new version of the most popular Linux distribution in Indonesia, BlankON 8.0 is now available for download. BlankON 8.0 with code name Sajadah is a Debian based Linux which is modified and equipped with several moslem applications such as QiOO - Al Quran in LibreOffice; Zekr - Al Quran translations and voice Tartil online; Minbar - prayer time reminder.

blankon 8 sajadah


How to manage Headless Virtualbox using phpvirtualbox on Ubuntu Server

On our previous tutorial, I already show you how to install Virtualbox on an Ubuntu Server. Now, I want to share how to manage the headless virtualbox on Ubuntu Server using phpvirtualbox. As a result we will have an ordinary Virtualbox interface on a web browser.
In order to manage Headless Virtualbox using phpvirtualbox on Ubuntu Server, follow these steps below. I assume you already installed Virtualbox on Ubuntu Server.

Ylmf OS 5 Beta Screenshots

Ylmf OS 5 Beta 4 is now available. Here we want to share some Ylmf OS 5 Beta Screenshots with you. Ylmf 5 is a nice and beauty Linux distribution that developed by Chinese community. It's interface looks like Windows and so its pretty easy to use. I cannot go any further to discuss this Ylmf OS on this blog since its uses Chinese as the main language, server etc.

Check out some screenshots of Ylmf OS 5 Beta version


ylmf-os-5-screen-3

How to install Virtualbox on Ubuntu Server 12.04

How to install Virtualbox on Ubuntu Server 12.04

In this tutorial I am going to show you How to install Virtualbox on Ubuntu Server 12.04. Ubuntu Server does not equipped with a Desktop environment or GUI so Virtualbox will also run as a headless virtualbox. But, still we can use Virtualbox to create and manage virtual machines via command line. OK lets get started. 

Steps to install Virtualbox on Ubuntu Server 12.04

Step 1. Open and edit /etc/apt/sources.list. Add the following line to it
deb http://download.virtualbox.org/virtualbox/debian precise contrib
Step 2. Add the Virtualbox public key
wget -q http://download.virtualbox.org/virtualbox/debian/oracle_vbox.asc -O- | sudo apt-key add -
Step 3. Update system
apt-get update
Step 4. Install Virtualbox and dependency files
apt-get install linux-headers-$(uname -r) build-essential virtualbox-4.2 dkms
Make sure you have a good internet connection since the command above will download some packages from the internet. 

Kategori

Kategori